3

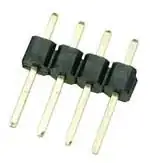
Newbie question here...I need to know the proper terminology so I know what I'm looking for. I have a bridge rectifier that has four flat blades on the bottom.

bridge rectifier

I want to throw it on a breadboard to test my circuit, and will eventally want to get it onto a pcb. Right now, I've got it connected to jumpers on my breadboard via four alligator clip cables, but there's GOT to be a better way.

Searching for "bridge rectifier socket" led me to some proprietary socket datasheets for a very specific rectifier that didn't fit. But not even a Mouser or DigiKey page in the top 50 or so results.

What am I looking for so I can get better search results?

dwwilson66
  • 3,402
  • 11
  • 33
  • 42

4 Answers4

6

That is a fairly high-power device, and is intended to be bolted to a chassis or heatsink for heat dissipation. It is not intended to be mounted on a PC boards.

Connections would normally be made using Faston(tm) connectors or by soldering wires directly to the terminals.

A rectifier connected to female spade connectors (also called "female spade terminals", also called "Faston connectors") looks like:

(via http://www.autotoys.com/x/home.php?cat=641 :) A rectifier connected to female spade connectors

(via http://www.tinboats.net/forum/viewtopic.php?f=4&t=19243 :) A rectifier connected to female spade connectors

Underneath all the insulation, a female spade connector looks like:

(via http://www.frozencpu.com/products/13613/ele-882/FrozenCPU_Quick_Disconnect_Female_Spade_Connector_-_28mm.html :) enter image description here

davidcary
  • 17,426
  • 11
  • 66
  • 115
Peter Bennett
  • 57,014
  • 1
  • 48
  • 127
  • 1
    I hope you don't mind me doodling all over your answer :-). – davidcary Apr 19 '13 at 05:23
  • Got a whole mess of those lying about as well...in the final design, the rectifier's screwed into a heatsink. I may just build the heatsink and use alligator clips to test the higher voltages when it comes down to it. – dwwilson66 Apr 19 '13 at 17:46
4

This bridge has large blades for a reason: there will be a lot current through the part. It therefore should be strongly discouraged to use this part on a breadboard.

There is a way though: you can use header pins. Search for things like "male header" and you should find something like this:

enter image description here

Cut or break it into four pieces and solder each pin on each blade of the bridge and you can use it on your breadboard.

  • Oh, yeah, the easy solution. I've got a bin full of header pins lying about. D'oh! :) Thanks. – dwwilson66 Apr 18 '13 at 16:58
  • 1
    @dwwilson66 The easier solution is to do this with pieces of wire, or even more cheaply, leads you have cut off other components that do fit in breadboards. – Phil Frost Apr 18 '13 at 20:42
4

The type of rectifier shown in your picture is intended for bolting directly to a heat sink via the hole in the center. It is for large currents.

For smaller currents, there are bridge rectifiers that have lead terminals for through-hole soldering. Or else you can use four diodes like 1N4001's.

Bridge rectifiers are not usually socketed, so that may be why "bridge rectifier socket" doesn't turn up much. Including yours. The rectifier you have has connector terminals exactly for the reason that it ends up being bolted to a chassis, away from both the transformer and the circuit board that it supplies. In these situations it has to be disconnected so the circuit board can be removed without removing the rectifier from the case.

Kaz
  • 19,838
  • 1
  • 39
  • 82
  • That makes total sense. I do need the larger rectifier for the current I'm expecting...makes sense why there would be terminals for the connections. I just did a quick search for bridge rectifier terminals and a bunch of results from digikey, vishay, etc., popped up, so I think that's the right track. :) – dwwilson66 Apr 18 '13 at 17:03
  • @dwwilson66: *"Typically the [breadboard] spring clips are rated for 1 ampere at 5 volts and 0.333 amperes at 15 volts (5 watts)."* (Wikipedia) - what current are you planning for? – RedGrittyBrick Apr 18 '13 at 17:29
  • If you are expecting a lot of current you may want to rethink developing this prototype on a breadboard. At very least review the current handling capability of the breadboard. – mjh2007 Apr 18 '13 at 17:31
  • Enough that I'm tempting fate testing this on a breadboard anymore. Right now I'm working with 5V & about 1.5A, but I'm doing a variable power supply that goes up to 18v...I'll save those tests for somewhere else. :) – dwwilson66 Apr 18 '13 at 17:32
0

For breadboard you might want a small (1 or 2A) bridge. types like W08, for example.

Like others have said, this large on is for chassis mounting and point-to-point wiring (either solder to blades, or 0.25" quick connects).

Marko
  • 825
  • 4
  • 8