1

I'm multiplexing 32 LEDs in a 4:8 configuration on an ATMega328 and am trying to dim them with what is probably a completely naive understanding of PWM. Note: I'm multiplexing them directly with 12 pins from the ATMega, no other chips are used at all. Basically, out of every 10 cycles of refreshing the whole display (which takes 8 of the ISR interrupt) I am just turning everything off for 2 of them if I want to show it at 80% brightness. But, in practice this just gets me a bunch of pulsing LEDs.

At first I thought I was just not calling ISR enough so I changed the prescale for 8 to 1, but that made no change.

Rough code is below. Any suggestions appreciated. I'm sure I'm doing this COMPLETELY the wrong way :P The multiplexing works fine and I'm getting a full display refresh rate of 244Hz I believe, which was seemed good enough. Just can't seem to dim.

Note: "data" variable is being changed in the (not shown) loop() method.

uint8_t pwmStep = 0;
uint8_t pwmMax = 10;
float pwmLevel = 0.8f; //range 0.5 - 1.0 (50% - 100%)

void setup()
{
  //port inits and other stuff here...

  // timer 1 setup, prescaler 8
  TCCR1B |= (1 << CS10);

  // enable timer 1 interrupt
  TIMSK1 = _BV(TOIE1);
}

uint8_t col, row = 0;
ISR(TIMER1_OVF_vect) 
{
  //Turn all columns off 
  PORTB |= (_BV(PB0) | _BV(PB1) | _BV(PB2) | _BV(PB3) | _BV(PB4) | _BV(PB5));
  PORTD |= (_BV(PD6) | _BV(PD7));

  if(pwmStep < pwmLevel*pwmMax)
  {
    //set the 4 rows
    for(row=0; row<4; row++)
    {
      if(data & (1UL << (row + (col * 4))))
        PORTC |= _BV(row);
      else
        PORTC &= ~_BV(row);
    } 

    //Enable the current column
    if(col < 6)
      PORTB &= ~_BV(col);
    else
      PORTD &= ~_BV(col);
  }
  col++;
  if(col == 8)
  { 
    col = 0;
    pwmStep++;
    if(pwmStep == pwmMax)
      pwmStep = 0;
  }
}

*Update: * Trying to do this with an ATTiny85, but not quite getting the results I suspected. It does dim it, but only a very small amount.

See code below. Even with OCR0B set to VERY small, I only get a small amount of dimming.

#define PRESCALE_1 _BV(0)
#define PRESCALE_8 _BV(1)
#define PRESCALE_64 (_BV(0) | _BV(1))
#define PRESCALE_256 _BV(2)
#define PRESCALE_1024 (_BV(2) | _BV(0))

void setup(){
  DDRB |= _BV(PINB0);

  PRR &= ~_BV(PRTIM0); //Enable Timer 0
  TCCR0A = 0x00; //Outputs disconnected

  // turn on CTC mode, 64 prescaler
  TCCR0B |= _BV(WGM01) | PRESCALE_64;


  OCR0A = 200; //~1200 Hz
  OCR0B = 50;  //~4800 Hz

  //
  TIMSK = _BV(OCIE0B) | _BV(OCIE0A); //Interrupts Enabled
}

ISR(TIM0_COMPA_vect){
  PORTB |= _BV(PINB0); //Set PINB0 on
}

ISR(TIM0_COMPB_vect){
  PORTB &= ~_BV(PINB0); //Set PINB0 off
}
Adam Haile
  • 1,603
  • 5
  • 31
  • 50

3 Answers3

2

To start with, I do not, nor have I have I ever used Arduino, but I am very familiar with AVR chips and the ATmega328p in particular. If I am understanding you correctly, you are trying to dim a 4x8 matrix of LEDs. The entire matrix should be dimmed all at once, but not every LED will always be on, meaning individual on/off control with collective dimming. This is actually a very simple thing to do. Let me start by explaining PWM control, since you mentioned you might not be doing it correctly.

If I have an LED and series resistor and connect 5V, it will shine at some brightness - a factor of the current through the LED, set by the series resistor. If I lower the voltage, the current will also lower causing the LED to dim. If I send a pulse to the LED, the effective voltage of the LED will be an average of the pulse on and off states. This percentage of on time is known as the duty cycle. The frequency of the pulse itself is how often it repeats. For example, to create a 100Hz pulse with a 50% duty cycle, I would want to turn a signal ON for 5ms and then OFF for 5ms. The total period is 10ms. Frequency = inverse of Period = 1/10ms = 100Hz. The duy cycle is 5ms/10ms = 50%.

Leds can switch on and off very quickly, but the human eye cannot distinguish these changes above a certain frequency - this value is different for different people. Considering that a TV refreshes at 60Hz in the USA (50Hz elsewhere), we can safely say that 50Hz is a good minimum, although many studies have shown that with LEDs, certain frequencies can actually cause the LED to appear brighter with the same duty cycle. A common number is 100Hz.

Controlling a single LED and even groups in this manner is very simple using a timer. The following code will enable Timer 1 to run at 125Hz (8ms period) with Fcpu = 16MHz.

  #define _BV(FOO) (1<<FOO)
  // Set up Timer 1 for 125Hz LED pulse to control brightness
  PRR &= ~_BV(PRTIM1);                  // Enable Timer1 Clock
  TCCR1A = 0x00;                        // Outputs Disconnected
  TCCR1B = _BV(WGM12) |                 // CTC Mode, Top = OCR1A
           _BV(CS11) | _BV(CS10);       // Prescaler = 64
  OCR1A = 1999;                         // Top = (16MHz * 8ms / 64)-1
  OCR1B = LED_DUTY_CYCLE;               // LED PUlse Width
  TIMSK1 = _BV(OCIE1B) | _BV(OCIE1A);   // Interrupts Enabled

In this code, compare match A will happen every 8ms, creating a 125Hz pulse. Compare match B will happen at whatever value is defined as "LED_DUTY_CYCLE." For an 80% duty cycle, as you mentioned, set OCR1B to 1600. This value could also be changed in code, such as when a user presses a dimming function button.

The LED control will take place in the ISR for the two compare matches. The variable "outputs" is updated in the main program whenever an LED should be on or off. Each bit of this variable maps to an LED. For example, to turn on LEDs 0 and 5, outputs should be set to 0b00100001 in main. The variable "brightness" can be updated in main to control the duty cycle of the LEDs. In the COMPA ISR, the LEDs that are enabled by "outputs" will be turned on. Then, all LEDs should be turned off in the COMPB ISR.

ISR(TIMER1_COMPA_vect){
  PORTD = (outputs & 0xFF);         // Turn On LEDs Q0 - Q7
  OCR1B = brightness;               // Set the pulse width
}
ISR(TIMER1_COMPB_vect){
  PORTD = 0x00;                     // Turn Off LEDs Q0 - Q7
}

In this example, there are 8 LEDs connected to each of the 8 pins of PORTD. They could be put anywhere, this just makes the code example easier to read. If the LEDs are spread around, you would need to do something more like this:

if(outputs & 0x01) PORTD |= LED0; 
if(outputs & 0x02) PORTD |= LED1;
if(outputs & 0x04) PORTC |= LED2;
//...
if(outputs & 0x40) PORTB |= LED6;
if(outputs & 0x80) PORTB |= LED7;

Note that each LED is mapped to a bit in "outputs", but the LEDs themselves reside in various IO ports. Whatever LEDs are enabled will be turned on.

Controlling a matrix is a bit more complex since only one column will be on at a time. With that in mind, the highest possible duty cycle you can achieve is 25% even if the LED rows were all ON all the time. That is because each column would only be on 1/4 of the total time. If more than one column is on at a time, then you will completely lose your ability to turn on and off individual LEDs. Something else to keep in mind with a matrix is the current consumption. Depending on your definition of row and column, you will have either 4 banks of 8 or 8 banks of 4 parallel LEDs. If the cathodes are all tied together, then that IO pin is sinking the current through all of the LEDs. The ATmega328p has a max current of 40mA per pin and a total of 200mA at any one time. The individual pin problem could be easily avoided by sinking the LEDs through a "logic level gate" MOSFET. Take a look at this schematic:

4x8 LED Matrix

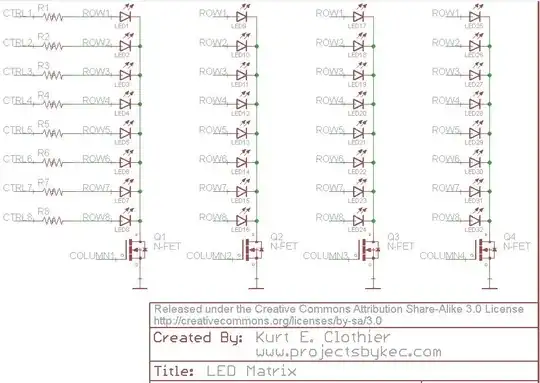
Of course, the whole thing could be rotated 90 degrees to suit your needs. In any case, the 8 "CTRL" lines will turn on an LED so long as the appropriate "COLUMN" signal is also high. The column control should be simple and can be done in main or a timer interrupt, but the PWM frequency should be about 4 times faster than the column switching frequency to ensure the dimming of the LEDs still works correctly. In that case, each column would be pulsed four times before the next column turns on. But, like I said, with 4 columns, each LED will only be on 25% of the time at max, so if your PWM duty is set to 80%, the LED is really only on .8 * .25 = 20% of the time. Also, don't forget that as the active column switches, the control swiches from one bank of LEDs to the next, so the "outputs" variable used above would need to be updated for the appropriate bank of LEDs whenever the active column switches.

Also of note is that it doesn't matter what you pulse to dim the LEDs. In the above example, I was pulsing the rows because its easy to enable a specific LED in that way. Pulsing the column control signal to the FET gate instead would also work. Lastly, since only one column is on at a time, each shared row can share a resistor. Each column cannot share a resistor because the individual brightness of the LEDs would changed depending on how many are turned on or off.

Kurt E. Clothier
  • 4,419
  • 18
  • 31
  • I'm pretty sure I understand this. I was completely unaware that you could handle duty cycle like that. What I'm still trying to understand is how to do this dimming with multiple "columns". I'm currently set up with a common cathode and 8 groups of 4. Basically, each I/O pin is only ever sourcing power for 1 LED at any given time. I just use 8 other pins and ground and only set 1 to ground at a time to turn on it's column. It's worked very well so far. Though now I wonder if I'm exceeding the current on the sink pin... – Adam Haile Mar 29 '13 at 01:13
  • It would depend on how many amps are going through each LED at a time. Worst case: with all 8 LEDs of one bank on, they could be a max of 5mA each (5 * 8 = 40mA max) if they are all sinked by one pin. That's why I mentioned using the FET driver to sink them. Then, it's only a matter of the total sourced current. The chip max is 200mA, so you could safely source 20mA per LED... 160mA total if all 8 are on. – Kurt E. Clothier Mar 29 '13 at 09:29
  • Weird... I've been sourcing 4 LEDs at a time to one sink pin and each LED is rated at about 20mA. I don't think they are actually running that high, but I would imagine more than 10mA. But I've had this running continuously for several weeks now with no problems. Granted, each group of 4 LEDs is only ever on for 1/6400 sec before moving on to the next group of 4. Given 8 groups, it's refreshing the whole display at 800Hz. – Adam Haile Mar 29 '13 at 11:32
  • My current update timer is configured as follows: TCCR1A = 0;// set entire TCCR1A register to 0 TCCR1B = 0;// same for TCCR1B TCNT1 = 0;//initialize counter value to 0 // set compare match register for 6400hz (800hz screen refresh) increments OCR1A = 2500;// = (16*10^6) / (1*6400) - 1 // turn on CTC mode TCCR1B |= _BV(WGM12); TCCR1B |= PRESCALE_1; // enable timer compare interrupt TIMSK1 |= _BV(OCIE1A); – Adam Haile Mar 29 '13 at 11:33
  • The timer is setup correctly for a 6400Hz ISR, but what are you using that for: to pulse the LEDs or to switch control from one LED bank to the next? As for the LED current, it doesn't matter what it is rated, it matters what resistor you put in series. Different LEDs will drop different voltages, the source minus the LED voltage is the resistor voltage, and the resistor voltage divided by the resistance equals the current: (Vs - V_LED)/R = I_LED. For example, a common red LED usually drops 2V. From a 5V source, a 300ohm resistor in series would yield 10mA through the LED. – Kurt E. Clothier Mar 29 '13 at 20:44
  • Both. I keep a step counter. As it increments I turn on the next column and off the rest. And then, I turn on any of the 4 LEDs in that column that need to be. So the whole display is updated at 800Hz, effectively. See code here: http://pastebin.com/PW2mFEqc Thoughts? Huh... go figure. I DID do the current math :P I'm using a 1.9 Vf LED and a 330 ohm resistor all at 5V, for slightly less than 10mA current per. x4 LEDs per sink pin < ~40mA... no wonder I didn't burn it out. – Adam Haile Mar 29 '13 at 21:31
  • You should comment your code a lot more (like every line) so someone else can understand what you are trying to do. On larger projects, if I don't work on something for a few days, it takes me forever just to figure out what I was doing! Since you are using 8 columns instead of the 4 in my example, your LEDs are only on 1/8 of the time with no dimming. I would suggest you pull most of that code out of the ISR to put it in main. Also, I don't see how you are using any PWM at all, but maybe because it isn't commented! – Kurt E. Clothier Mar 29 '13 at 21:44
  • Right now the only one that needed to know it was me... but it will be commented before being made public. I realize they are only on 1/8 of the time, but I had to minimize the current per column. Why should I put it in the main? Then I don't have control over the update frequency... I'm not doing proper PWM, that was the problem... but I'm faking it with this line: if(pwmStep < pwmLevel); I increment pwmStep ever time I complete a scan through all 8 coumns. Up to 10. So if pwm step is 5 and pwmLevel is 5, it skips the last 5 updates and the light are only on 50% of the time... make sense? – Adam Haile Mar 30 '13 at 01:21
  • Any chance you would know how to do your above example code for the ATTiny85? I'm trying to port it to that but am not having luck getting it to act right. – Adam Haile Apr 03 '13 at 23:58
  • It should work the exact same. It still has a 16 bit timer 1, however, the register names are different for that MCU. Take a look at the datasheet for the ATtinyx5. In particular, you should check out section 12.3 - Timer 1 Register Descriptions on page 88: http://www.atmel.com/Images/Atmel-2586-AVR-8-bit-Microcontroller-ATtiny25-ATtiny45-ATtiny85_Datasheet.pdf I typically would use the 8 bit timer0 for everything since it uses less power (disabling the other timers with the power reduction register, PRR), but I think Arduino already uses timer0 for various things. – Kurt E. Clothier Apr 04 '13 at 01:14
  • Also, the tiny25 is cheaper than the 85 and has plenty of space for most small programs. That's part of the reason I mentioned moving a lot of your code from the ISR to main. You want as little code in your ISR as possible - that keeps the code a lot smaller. Check out this great app notes on writing efficient C code: http://www.atmel.com/Images/doc1497.pdf and http://www.atmel.com/Images/doc8453.pdf – Kurt E. Clothier Apr 04 '13 at 01:16
  • Actually, I'm pretty sure the ATTinyx5 series only has 8-bit timers. I just can't seem to get the right register names set since they are all different :P – Adam Haile Apr 04 '13 at 01:27
  • Though, on the arduino-tiny core I'm using it uses Timer1 for millis() anyways, so I probably should just use Timer0... suggestions? I can't seem to match up the ATTiny85 Timer0 registers with the example you had. – Adam Haile Apr 04 '13 at 01:29
  • Took a stab that sort of works on the ATTiny85. See added code in Question above. Thoughts? – Adam Haile Apr 04 '13 at 02:53
  • Sorry, you are right. Only 8 bit timers. In that case, you can't use values over 255, so the max resolution is less. The only thing I can see wrong is it should be: TCCR0A = _BV(WGM01); You tried to set it using TCCR0B. Other than that, it should work fine. To see if the LED is actually dimming, try increasing/decreasing your OCR0B value in main between 0 and 200 every 100ms. You should see the LED get dimmer/brighter every 100ms when the OCR0B value changes. – Kurt E. Clothier Apr 04 '13 at 04:44
  • Ahhh... that works much better. Only problem I'm having is the timing between changing the duty cycle value. Trying to user the arduino-tiny core and even though I think I'm using the right timer to not interfere with the millis() or delay() call, it seems that my timer setup is interfering with those working. – Adam Haile Apr 04 '13 at 18:05
  • You're on your own with that one. Like I said, I have not, nor do I ever care to use Arduino. I design my own embedded systems around whatever chip I want to use. It gives me so much more freedom and control. Personally, I think Arduino is worthless overhead that only prevents its users from learning how things actually work. – Kurt E. Clothier Apr 04 '13 at 20:04
  • Well, is there a way to do a time delay in straight-up AVR code? I'd rather use that as well. – Adam Haile Apr 04 '13 at 20:16
  • Yes, many! And I think you mean to say "c code." The most common programming languages used with AVR are C and Assembly. I believe Arduino uses a modified C++, which is an advanced version of C. There is the a header file which can be used for delays. See the documentation here: http://www.nongnu.org/avr-libc/user-manual/group__util__delay.html Or you could create you own ISR routine to control the flow of your program. I almost always use timer 0 to create a 1ms clock, and then use that to time everything in the program: delays, PWM, button checks, etc. – Kurt E. Clothier Apr 04 '13 at 22:14
1

I'd start by removing the floating point operations from within an interrupt on an AVR because they can be very CPU intensive and depending on clock speed maybe the interrupt isn't completed when the timer is ready to next be fired. For example change:

uint8_t pwmMax = 10;
float pwmLevel = 0.8f;
....
if(pwmStep < pwmLevel*pwmMax)

to:

uint8_t pwmMax = 100;
uint8_8 pwmLevel = 80;
if(pwmStep < pwmLevel)

Ideally for PWM you'd want to interleave the switching, so for example at the moment over say 10 interrupts you'll be doing the following:

1 1 1 1 1 1 1 1 0 0

Whereas the following sequence would be ideal:

1 1 1 1 0 1 1 1 1 0

However that would complicate things and at over 50Hz I wouldn't expect the flickering to be visible so that doesn't sound like your real problem.

PeterJ
  • 17,131
  • 37
  • 56
  • 91
1

I respectfully disagree with PeterJ about interleaving: while it true that this is ideal, no commercial LED dimmer does this, AFAIK. All the ones I have seen do not interleave the on and off cycles in the way you suggest. And given fast enough PWM, it doesn't really matter.

One thing to keep in mind is that PWM to intensity mapping is not linear, rather it is exponential. Using powers of two, the number of cycles the LED needs to on for is 2^(intensity) or 2^(intensity)-1. My preference is for the latter, so we'll go with that. This means for 4 intensities (intensity levels 0-3) you need to divide your PWM period into 7 cycles and your leds should be on for 0, 1, 3, and 7 cycles respectively.

Of course, this doesn't solve your problem either. Do you need to dim the LEDs individually or collectively? If the latter, you can use AVR's PWM facilities and not code your own. If this is out-of-the-box AVR chip, it has the 8x divider, so you are running 1mhz, and it might just be the case that your pwm code is too slow. You can turn that off without burning fuses as follows:

CLKPR = (1<<CLKPCE);  // CLKPCE bit must be set immediately before CLKPS bits
CLKPR = 0;  // System clock divider = 1

This should at least make your LEDs flash faster :) But in any case a circuit diagram would be helpful.

angelatlarge
  • 3,611
  • 22
  • 37
  • I'm running a standard arduino setup ATMega328, so it's running at 16MHz. Not really sure how I would use the built in PWM though since the chip only has 3 PWM pins and I believe I would need at least 4 (since I have 4 common cathodes for the LEDs). Correct? Even if there were enough, how would I do that? – Adam Haile Mar 10 '13 at 12:07
  • To clarify the pinouts, these are the one's that matter: //Setup common cathodes as outputs DDRC = _BV(PC0) | _BV(PC1) | _BV(PC2) | _BV(PC3); //Setup rows as outputs DDRB = _BV(PB0) | _BV(PB1) | _BV(PB2) | _BV(PB3) | _BV(PB4) | _BV(PB5); DDRD = _BV(PD6) | _BV(PD7); – Adam Haile Mar 10 '13 at 12:13
  • And... I need to dim the LEDs collectively. Not all of them are always on, but it's just a whole display dimming. Knowing *how* to do them individually would be cool for future projects, but not what I need now. – Adam Haile Mar 10 '13 at 12:14
  • 1
    Apparent brightness is logarithmic rather than linear, but if one is using colored LEDs, the apparent hue of e.g. red 10% blue 20% will be about the same as that of red 5% blue 10%. – supercat Mar 26 '13 at 21:48