3

Say I wanted to learn AVR ASM, and I had an arduino.

Now i know you can program assembly on the arduino, but is there a way to do it through USB. I assume i'd just write normal assembly and do it through avr-dude, but am I missing anything or do I need a serial programmer to do this successfully?

am I missing anything? or should this be as easy as i said above?

I believe i've heard around using "inline" assembly....but how different would this be from actually writing ASM directly to the AVR?

  • [This ->this](http://electronics.stackexchange.com/questions/57120/avr-assembly-on-arduino-through-usb) post of yours looks similar to [this](http://electronics.stackexchange.com/questions/12750/arduino-with-assembly) post of yours – Chetan Bhargava Feb 05 '13 at 05:31
  • I know, but I was mainly curious of what steps. I realize it was a similar question. This is more of a "how" as opposed to a "can it" –  Feb 05 '13 at 15:37
  • Are you looking for a workflow (steps)? You would not learn enough about assembly language programming using inline assembly. – Chetan Bhargava Feb 05 '13 at 19:15

6 Answers6

3

You can use AVRA (AVR Assembler) on Linux to develop your assembly language program on Linux. I'm on Linux and free both as in beer & freedom of use.

Plan to use AVRDUDE (also free - both above contexts) to burn in your object code. I have used it in Linux.

Plan to use another (cheap - free as in opensource) Arduino like as a programmer. I have used one here and documented. In my article, I download a bootloader to a new ATmegaxx, instead you can burn in your own program. I did it all through USB (as you asked).

You definitely can use an USB based Arduino or RBBB+USB cable to program your target Arduino using USB. RBBB is indeed a utility Arduino that I have used in that role.

Overall, to use my solution, you would have to use another programmer or another cheap Arduino like RBBB. I also have reviewed RBBB in my other post.

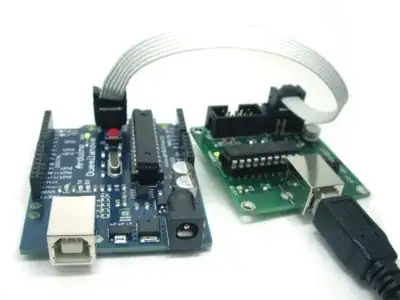
Another way to program your Arduino with another Arduino.

Programming your Arduino using a third party USB programmer. enter image description here

Chetan Bhargava
  • 4,612
  • 5
  • 27
  • 40
3

It is very simple. Use the Avr studio to write the code in assembly and compile it. Then feed the hex file to XLoader software to upload it to the arduino through USB like you do in Arduino IDE. No need for any extra burner/programmer.

0xakhil
  • 2,225
  • 7
  • 35
  • 33
2

I recommend in-line assembler in C. The gcc-avr you're already building sketches with lets you write assembler with placeholders for the register names. The C compiler then assigns the registers during its optimization pass. You get the convenience of C and the control, where you need it, of assembler. There are no new tools to install, and your Arduino USB development process doesn't change.

2

Switching from C to assembly does not require any change in the method of loading the final binary object into the chip.

If you were able to load Arduino sketches into the board via the USB, then you are also able to load bare-metal C programs, and Assembly language programs.

All that you need is a toolchain which will produce appropriate binary images for use with avrdude.

For a bare-metal C program, you can do this using the copy of avr-gcc already installed by the Arduino IDE, and it might be worth reading the guides for doing so as a first step. Then you can alternatively give avr-gcc assembly langauge files (.s) instead of C source files.

EDIT: to clarify: "bare-metal" metal programs do not preclude retaining an Arduino-style bootloader, unless you set your toolchain address mappings to produce code which wants to overwrite the bootloader and use a programming tool (/tool options) willing to overwrite it. A few seconds after boot, the bootloader transfers control to your program, and remains entirely out of the way - just passive "data" claiming space at one end of flash - until the next reset.

Chris Stratton
  • 33,282
  • 3
  • 43
  • 89
1

I found your question while trying to do the exact same thing: program an existing Arduino board in pure AVR assembly without having to use any additional hardware. I ended up figuring out how to do it on my own, so I want to share my answer which anyone should be able to re-use on Windows.

First, download Atmel Studio. I'm using version 6.1. This will let you compile the AVR assembly code you write into a .hex file which will be written to the microcontroller on the Arduino board. My Arduino board is an Arduino Uno which uses the ATmega328P chip, so select that when creating a new project in Atmel Studio.

If you're like me and trying to learn AVR Assembly, you will probably also want the 8-bit AVR Instruction Set guide which tells you what instructions you can use on the ATmega328P.

Here is the code I use to get a blinking LED on Arduino in pure assembly:

/*
 * Get an LED blinking on the ATmega328 (Arduino)
 * On Arduino, pin 13 has an on-board LED which blinks. Pin 13 should map to PB5 (SCK/PCINT5) on the MCU.
 */ 

 .ORG   0x0000                  // Tells the next instruction to be written
 RJMP   main                    // State that the program begins at the main label

 main:
 LDI    r16, 0xFF               // Load the immedate value 0xFF (all bits 1) into register 16
 OUT    DDRB, r16               // Set Data Direction Register B to output for all pins

 loop:
 SBI    PortB, 5                // Set the 5th bit in PortB. (i.e. turn on the LED)
 RCALL  delay_05
 CBI    PortB, 5                // Clear the 5th bit in PortB. (i.e. turn off the LED)
 RCALL  delay_05
 RJMP   loop                    // Loop again

 // Everything beneath is part of the delay loop
 delay_05:
 LDI    r16, 8

 outer_loop:
 LDI    r24, low(3037)
 LDI    r25, high(3037)

 delay_loop:
 ADIW   r24, 1
 BRNE   delay_loop
 DEC    r16
 BRNE   outer_loop
 RET

Locate the .hex file that Atmel Studio creates when you compile the above code. Mine is in C:\Users\John\Documents\Atmel Studio\6.1\AssemblerApplication1\AssemblerApplication1\Debug.

The Arduino IDE uses AVRdude to send the programs that you write in C to the Arduino board. You can see this by turning on verbose output in the Arduino IDE and watching what happens in the log. I found that using the same version of AVRdude that the Arduino IDE installs works well. Here is the command to upload your program to your Arduino:

"C:\Program Files (x86)\Arduino\hardware\tools\avr\bin\avrdude" -C avrdude.conf -v -p atmega328p -c arduino -P \\.\COM5 -b 115200 -D -U flash:w:compiled-code.hex:i

You'll need to use a different command if AVRdude is installed in a different spot. You'll also need to find your copy of avrdude.conf and copy it (along with the .hex file from the Debug folder above) into the folder from which you'll run the above command. It's best to turn on the verbose output in the Arduino IDE and verify the correct command for yourself. (For instance, your Arduino might not be connected over COM5.)

You can read more about the options used by AVRdude on ladyada's AVR Tutorial. The instructions above won't work if you don't already have an Arduino working with the Arduino IDE- in other words, the Arduino bootloader must already be on your ATmega328 chip. This will not overwrite the bootloader, and you can easily switch from using this method of programming back to using the Arduino IDE with no headaches.
John
  • 131
  • 3
1

The problem is that without the Arduino BootLoader there is no direct support for the USB, to upload. Even the Arduino BootLoader needs to be initially uploaded. This is typically done using the ICSP connection. You can use various cheap ICSP programmers such as USBtinyISP which can be found very cheap. If you look hard enough.

Or as above mentioned you can even use another Arduino as ArduinoISP or above mentioned RBBB to do this.

Alternatively, you could just code the Assembly inline to the Arduino Sketches:

Playground

__asm__("nop\n\t""nop\n\t""nop\n\t""nop\n\t");

or avr-libc

asm("in %[retval], %[port]" :
[retval] "=r" (value) :
[port] "I" (_SFR_IO_ADDR(PORTD)) );

So you could try out your assembly code and directly in the Arduino

mpflaga
  • 1,345
  • 6
  • 10
  • In this mention of an "Arduino kernel" you are confusing the bootloader, which is what would allow loading the code over USB with AVRdude, with the arduino runtime components which would not be used in a bare-metal program, and thus reaching a mistaken conclusion that the existing upload mechanism would not work. – Chris Stratton Feb 05 '13 at 20:06
  • Edit is an improvement, but this is still a good answer to a different question than was asked. The target is not a new AVR chip, it's an Arduino which already has an Arduino bootloader - and so is as ready to accept bare metal programs without use of any additional hardware as it is to accept the Arduino sketches for which it was marketed. – Chris Stratton Feb 05 '13 at 21:17
  • I had believed/witnessed that the files loaded through AVR-Dude wiped the bootloader. Hence no bootloader. Sounds like that may not always be the case. As I always had to "Burn Bootloader" after each time I used "Upload Using Programmer" from the Arduino IDE. Apparently blanked the bootloader. Can you provide a link to an illustration of the technique to use the compiled code and AVR-DUDE(over USB to Arduino's Bootloader) usage, as to maintain the bootloader. – mpflaga Feb 05 '13 at 21:49
  • Also I feel that putting the ASM code directly into the sketch is a legitimate answer as it does not use extra hardware. Admittedly it is ad-hoc but simple enough for the novice. – mpflaga Feb 05 '13 at 21:51
  • it's likely that the 'upload using programmer' option assumes you do not have (or want to retain) a bootloader on the target. That's not an option you'd normally use with a working Arduino - otherwise you'd use the bootloader already on it. At any rate, for assembly language or bare metal C projects I'd use avrdude from the command line or my own build system, not the Arduino IDE at all. – Chris Stratton Feb 05 '13 at 22:14