1

Question about rewinding a brushed DC motor:

I've taken apart a DeWalt router to see why I was getting so much sparking (already tried replacing brushes). While testing the resistance between commutator bars, I found a high peak which corresponded with a burn mark. This is my first time doing this and just going off the internet, does this mean the wire is damaged somewhere?

I think the only options are to replace the rotor or rewind the existing one. I know the latter is a bit out of my depth but I'd like to give it a go, especially if the armature I'm doing it on is wrecked anyway - can anyone point me to a good reliable explanation of the winding? I think I've got my head around it, but it would be good to have confirmation from someone who actually knows what they're doing. I've seen a few diagrams that all looked slightly different.

FOLLOW UP: I've been looking around for a matching commutator to replace the current one. I think this will be easier than trying to solder the wiring into the tabs on the bars with them already spot welded down (i think?). The closest match I have found is 2 mm smaller in diameter (original 33.5, measured worn). Are there any issues with changing the nominal diameter of the commutator a little? This would bring the distance from the commutator to the brush housing to around 3mm

Thanks.

  • If I was going to do that, I would probably watch some YouTube videos. Likely the only way to determine the wire size and number of winding turns is to measure the wire and count the turns as you take them off. –  May 17 '19 at 18:12
  • One time I had a cheap dremel tool and a friend burned out the winding, I opened it up and touched the ends of the burned out section and it worked. Got lucky I guess – Voltage Spike May 17 '19 at 18:34
  • @CharlesCowie yeah that's my general plan. Everything looks to be coated with some clear finish though so not sure how I can take the wire off without cutting it out, which i imagine will make it alot harder to count – india_tango May 17 '19 at 18:37
  • @laptop2d what you do mean by"touched the burned out section"? as in you sanded it back or literally just touched it? I cleaned up the commutator with 1000 grit paper but i assume if i put it back together it will just burn up again? – india_tango May 17 '19 at 18:39
  • @india_tango As it, I pushed the copper together with a screw driver and it worked. I was way surprised. No soldering or anything like that. – Voltage Spike May 17 '19 at 18:45
  • It seems like the commutator burn mark occurred when a magnet wire winding shorted and then it fused open. – Tony Stewart EE75 May 17 '19 at 18:50

1 Answers1

5

There are two paths through the windings from any bar in commutator motor of this type to any other, so a high reading indicates that one of those paths has broken or burned out.

Before you bother to do anything with the winding, feel, or ideally measure with a dial gauge, whether the bar that has the burn mark on it is any higher than the others. If it is, and this is common, the insulation material below that bar has been damaged, and the commutator is unusable.

Unwinding - you need to determine three things as you unwind:

  1. The number of turns in each coil. Power tool armatures commonly have multiple coils in each slot, often 24 commutator bars to 12 slots, giving two coils in each slot.

  2. The gauge of wire used. Since the armature will be varnished, it can be difficult to get an exact measurement, but the coil sides towards the bottom of the slot will generally be less well coated, and easier to clean away the varnish - but not the coating on the wire. There are tables online you can use to find the size of the insulated wire vs. the nominal size, such as here

  3. The connection to the commutator. Depending on where the brushes are located relative to the field coils, the coils will likely not be connected to the commutator bar directly under them. There's frequently an advance incorporated (for better brushwear), and on most machine wound armatures, the wire will run around to the opposite side of the commutator, around a hook or 'tang' at the top of the bar, that is later flattened down in a resistance welder, and then around the rest of the way to the next coil.

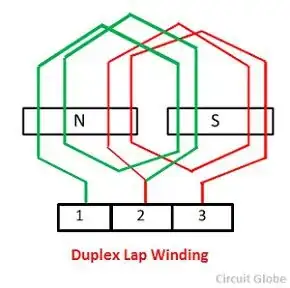
Here's a link that describes the possible winding patterns you can encounter. Almost all power tools are lap wound, and likely duplex or triplex.

winding patterns

Once you've wound the armature, your next challenge is to connect to the commutator. If you have a large soldering iron, you may be able to solder the wire to the commutator - to do this you need to either carefully scrape off the wire coating, or use a solderable wire, where the coating will burn off under the heat of the iron. This type of wire is less tolerant of heating through overloading, and also mechanical damage during winding, so it isn't that commonly used in commutator armatures. The resistance welded commutators generate enough heat locally to burn off regular wire coating, but care is needed to set up these welders to avoid that heat damaging the rest of the bar.

Finally you need to coat the windings in a varnish. This is an electrical varnish, that is heat tolerant, and also strong enough to stick the winding mass together so that they don't fling out at speed.

I've rewound many armatures - unless it's an unusual motor, and you can't get a replacement it is rarely worth the effort. Finding a local rewinding shop might be an option, but these have disappeared at a rate now that motors from the Far East are so cheap that repair is not that often justified, at least for smaller motors.

SamGibson
  • 17,231
  • 5
  • 37
  • 58
Phil G
  • 5,609
  • 1
  • 10
  • 18
  • This is an awesome answer, thank you. Re the burnt bar it doesn't appear raised but i don't have a dial gauge and i've already sanded it so i might have inadvertently disguised it.. As to whether it's worth doing, I appreciate that it would definitely make more sense to buy a replacement; i'm really just curious to have a go at it myself, even if only to be left with a fond memory of the weekend i spent failing to fix a broken motor! Thanks for your response. Supremely helpful – india_tango May 17 '19 at 20:08
  • Just a follow up question; any chance you know of a solvent that would strip the varnish from the wires? Was thinking to try dipping it in paint stripper before attempting to unwind it - i've used the same stuff for stripping brake calliper paint etc and doesn't seem to be much it doesn't eat through. – india_tango May 18 '19 at 21:26
  • It's usually a two component epoxy that cures by polymerization rather than just drying out of solvent, so there's not much that will dissolve it. For remanning of motors we used an oven that burned out the insulation, but that's not possible if there's any insulation you need to keep, like the commutator and maybe an insulating tube between the stack and shaft if it's a double insulated motor. What I usually did, after getting the first coil out to measure the wire/turns, was to saw down the slot from the OD to the slot bottom to leave two triangular pieces, that then snap out of the slot. – Phil G May 20 '19 at 13:29