0

schematic

simulate this circuit – Schematic created using CircuitLab

schematic

simulate this circuit

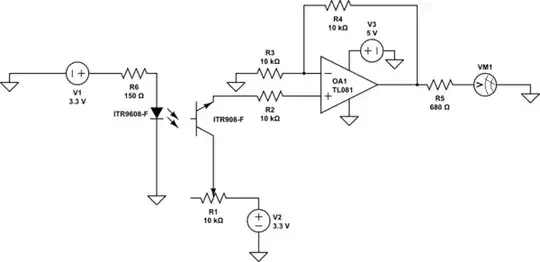
Right now my configuration of my circuit is this: https://i.stack.imgur.com/F1Pey.jpg

The only difference is that now I have 5V being fed into the +Ve rail of the op-amp and 3.3V fed into everywhere else. This is within the specifications of the LM358 minimum voltage for the single supply rail (3V) and the offset difference from rail to input (+Ve - 1.5V or 3.5V in this case) as shown here: http://www.ti.com/lit/ds/symlink/lm158-n.pdf

The circuit works and by adjusting the light of the opto-interruptor I can see a change of 3.35V (When light beam is unobstructed) to 1.53 (When it is), although I would like to have a larger difference so that the the system is more sensitive to changes in light levels.

So I decide to try to use this YwRobot 545043 breadboard power supply and measured 14.63V across it's positive and negative terminal. I have the +Ve (Pin 8) being fed from this, and all grounded nodes and other sections of the circuit going into the - pin of the power supply so I have one single common ground. In the circuit above all instances of 3.3V is replaced with 5V (so 5V being fed into the opto-interruptor).

However now the op amp will not output and there is no change due to the light level. Is there something I'm missing?

FrankerZ
  • 41
  • 1
  • 7
  • 1
    You will get more answers to this if you draw out the schematic using the inline schematic editor according these guidelines http://electronics.stackexchange.com/questions/28251/rules-and-guidelines-for-drawing-good-schematics – stefandz Aug 12 '15 at 17:11
  • oh my gosh, please don't put 3.3V rail on the bottom.. Draw your schematic properly using the built-in circuit layout on this website like @StefanDzisiewski-Smith suggested, and do the receiving side of the phototransistor with the correct orientation. You describe two different situations, try to draw the schematic for the initial working circuit, and then show a second schematic for the second set of conditions where it does not work. Make sure you show appropriate voltages and also check your physical wiring and ensure common grounding etc. – KyranF Aug 12 '15 at 17:30
  • I actually didn't realize there was an inline designer so doing that now although it doesn't have specific parts, is there a way to design specific parts? Also what is wrong with 3.3V? – FrankerZ Aug 12 '15 at 17:37
  • Added in the inline schematic, the other situation is basically replace V3 in the op amp rail with a 14.63V source and V1 & V2 with a 5V source. I couldn't find an optoisolater in circuit lab so the diodes output (The light) is the 'gate' of the NPN transistor. – FrankerZ Aug 12 '15 at 17:50
  • You really have no current limiting resistor in series with the optocoupler's LED? – The Photon Aug 12 '15 at 17:51
  • Oh whoops left out a 150ohm resistor in the schematic. – FrankerZ Aug 12 '15 at 17:53
  • A schematic of the circuit when you used the 15 V supply would probably also help. If you connected 15 V to the op-amp input with only 3.3 or 5 V on the supply pins, you probably blew the op-amp. But I' can't really tell what you did. – The Photon Aug 12 '15 at 17:53
  • Added the additional schematic and the op-amp is fine, going back to the old configuration with only 3.3V and 15V works. To clarify, 15V is going to the actual +Ve supply rail while 5V is going into the positive input so I have a non-inverting configuration. With only 3.3V and 5V I find that my op amp simply does not amplify enough before I'm hitting the supply limit (Since my understanding is a 5V supply means my op amp can output from a range of 0 to 3.5V). So the reason I'm trying to use 15V is to increase my range so I can amplify further. – FrankerZ Aug 12 '15 at 17:58
  • Nothing you shared explains the failure. One guess: higher current through the LED is saturating the opto-interruptor. Try increasing R6. Another guess: No bleed resistor from the op-amp non-inverting input, so once charged up, the voltage would never go low. But that should have been a problem with the lower supply voltages also. Anyway try adding a bleed resistor (maybe 100 kohm, depending on how fast the circuit should be) to ground. – The Photon Aug 12 '15 at 18:09
  • I apologize, I can't really figure out what else it could be. I've put the bleed resistor onto the circuit but no known change. The 5V and 3.3V configuration still works while the 15V and 5V will not. According to the data sheet I'm still within the op amp voltage specifications. – FrankerZ Aug 12 '15 at 18:17

2 Answers2

1

That circuit cannot work- the LM358 has about 40nA of current flowing out of the input pins and you have a phototransistor and resistor to +5, so there is no way it gets pulled down.

Try grounding one end of R2. leave the other end connected to the op-amp, and connecting the phototransistor emitter to the non-inverting input.

Spehro Pefhany
  • 376,485
  • 21
  • 320
  • 842
  • I've added a bleed resistor of 20k so R6 is brought to ground, and the output is already connected to the non-inverting input. However circuit one configuration works while circuit 2 does not. Is this some sort of saturation issue? – FrankerZ Aug 12 '15 at 23:46
  • You mean "bleed resistor of 20k so R2 is brought to ground" correct? R6 doesn't need a bleed resistor. When it's not working what are the voltages on the + and - terminals and the output of the op-amp? The LM358 is a PNP input stage where the bias currents flow out of the terminals so neither circuit you show should work without a pull-down on the emitter or + input of the amplifier. – John D Aug 13 '15 at 16:51
0

What are you trying to achieve?

Do you want a analog output according to the light level of the LED? Then you can not use opto-coupler for converting.

If you want just a digital output (which give a good voltage output difference for LED-on & LED-off ) then use a comparator instead of an amplifier.

Duresh
  • 1
  • 3
  • I do indeed want a linear analog output and not a digital ON/OFF sort of deal. Why is an opto-interruptor not able to do this? – FrankerZ Aug 13 '15 at 06:35
  • it is designed to give digital output. As the name says ("interrupt") interrupt something – Duresh Aug 13 '15 at 07:19