0

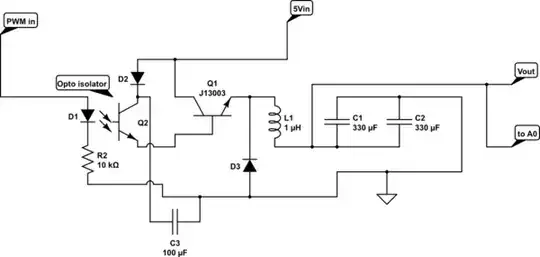
I've started learning about Buck Converters, and I made a miniature one on an Arduino prototype shield. But when I turn the thing on, the voltage is stuck at 5v (the voltage input). I tried disconnecting the PWM line, no effect; and grounding the gate on the transistor (a 4800 n channel MOSFET I salvaged from a laptop) only causes a tiny drop (0.5v) on the output. Here is my circuit:

schematic

simulate this circuit – Schematic created using CircuitLab

I don't think it's a bad transistor, it took 10 seconds to desolder, and then 15 more to resolder it on a different board. Can anybody show me what I'm doing wrong?

UPDATE: So, I fixed the transistor problem, and made the gate driver an optocoupler. I also added a boost capacitor and flyback diode. Now the problem is that the circuit can't handle any sort of load at all without going unstable. I have updated my schematic. Strangely, the schematic editor doesn't have any opto-isolators, so sorry if that part is a bit messy. For control, I have an Arduino Nano adjust the PWM to a set voltage (3.3 for testing). The regulator is very accurate, only off by 0.01 volts, until I apply a load. Then the voltage drops anywhere to 1.8v for an LED, to 0.2v for a small fan. The transistor also gets very hot when I connect the fan, which shouldn't be the case because it was designed to handle up to 700v and 1.5A. I really don't know what I'm doing wrong here. Also, the flyback diode only had 3107 for the markings. Another note, the voltage takes a really long time to stabilize, even at 100% duty cycle.

Jaca
  • 171
  • 9
  • 1
    Please read [Rules and guidelines for drawing good schematics](http://electronics.stackexchange.com/questions/28251/rules-and-guidelines-for-drawing-good-schematics), and consider improving your schematic to make it easier for others to understand your question. – The Photon Jun 03 '15 at 05:09
  • @ThePhoton Sorry about that, how does it look now? – Jaca Jun 03 '15 at 05:16
  • It will be most clear if the higher potential terminals were at the top of the page and lower potential terminals were at the bottom of the page. – The Photon Jun 03 '15 at 05:24
  • Hint, as you have the circuit connected, the NMOS will be useless because of conduction through the body diode. – The Photon Jun 03 '15 at 05:32
  • @ThePhoton So, I have the NMOS backwards? – Jaca Jun 03 '15 at 05:42
  • Try using a p-channel MOSFET (as others have said you have gate drive issues) and you need a flyback diode so the inductor current can continue to flow when the MOSFET turns off. – Jon Jun 03 '15 at 09:16

2 Answers2

1

To open the gate you need Vgs more than the threshold voltage. For instance 5V. But in your circuit you will not get it.

You need boost capacitor and a diode to power up the NPN, and actually you need something like optocoupler instead it, so Arduino would be able to drive it.

And you need a diode between ground and inductor left terminal.

I recommend you to google any TI DC/DC and see how they work. Start with TPS54160.

  • And the MOSFET should be reversed... Well, this circuit can't work, sorry. –  Jun 03 '15 at 06:08
  • The optocoupler helped a lot, but I also had to replace the transistor with something smaller. At least until I can get the darn thing to switch correctly. I place it in the right way, but the circuit behave the same. – Jaca Jun 04 '15 at 03:00
  • You still need boost capacitor and diode. Do you understand what it is? –  Jun 04 '15 at 03:02
  • Oh, I put those two in as well. Also improved performance. I just have to play around with the transistor to get it to work. Unless it really is busted. But the circuit works. Only, it's not strong enough to even light an LED without tremendous voltage drop. – Jaca Jun 04 '15 at 04:15
  • First, update the scheme so i can see what you have already done. Second, once the circuit is ready, you have to run it with constant PWM to see that it works. You cannot expect the control loop to work right now. Also please show your feedback scheme. –  Jun 04 '15 at 04:18
  • Okay, I updated the question. – Jaca Jun 04 '15 at 04:37
  • Boost cap is in the wrong place. It should be connected to optocoupler collector instead 5v.the diode should be from 5v to optocoupler collector. Another diode from gnd to inductor, like now. –  Jun 04 '15 at 04:59
  • Update the scheme so i know you understand –  Jun 04 '15 at 05:05
  • So, like that?? – Jaca Jun 04 '15 at 05:16
  • Yes, much better –  Jun 04 '15 at 06:45
  • Ok, still not good. The boost cap should be 0.1uf,and the lower side not on gnd, but beyween switch and inductor –  Jun 04 '15 at 06:46
  • The node on q1 emitter is called switching node. So the boost cap should be one side there, another on the q2 colector. –  Jun 04 '15 at 06:59
  • Do you mind editing my scheme? I completely lost you. – Jaca Jun 05 '15 at 05:40
1

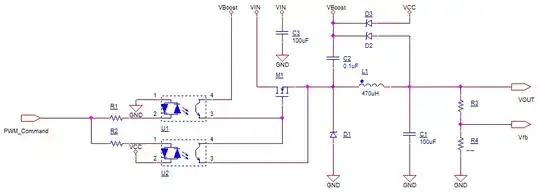
Arduino- controlled buck regulator power stage

Ok, so this is the scheme i propose.

Disclaimer: in real life you will never do anything like that. This is only good for detailed buck controller study. This is not cost effective, not universal, not very power efficient and not simple at all. If you want a real design, you need to refer to buck controller IC of any descent vendor and read the datasheets accurately.

Disclaimer 2: i am not sure for how long and how deep i will be able to explain the theory. You must study that by yourself, it's not that hard.

So in the scheme i propose, you have a switch MOSFET, inductor and output capacitor that will do a good job for 20kHz PWM (i don't think Arduino can do much better), D1 will allow L1 to keep conducting when the switch is off.

R3 and R4 will provide feedback. Configure them so when the output is stable, the voltage is in the middle of your ADC range, probably it will be 1.65V

Now what made you most of your problems. To drive M1 you need voltage higher than Vs. So there is C2 that will be precharged to VCC at the beginning, and once your output is stable, with VOUT. When M1 will be switched on and the voltage on switching node will rise to VIN, C2 will still be charged, and provide VIN + VOUT voltage, allowing to keep M1 open.

U1 and U2 are used to quickly charge and discharge M1 gate. Pay attention, i use AC optocouplers. For DC optocouplers you may need a bit different input. Under no condition open both of them!!! it will just blow them. Consider logic gate to prevent such event.

Components selection: Define what voltage and current you need on output.

Select the L1 to have 200% of IOUT

C1- 200% of VOUT.

D1- 200% of IOUT and 150% of VIN for reverse bias, low leakage, minimum forward voltage.

C2- 200% of VOUT

C3- 150% of VIN

M1- VDS > 150% of VIN, Idrain > 150% of IOUT, VGS < 80% VOUT, VTH < 80% of VCC

Testing: Start with VIN = 12V and PWM of 20kHz, 50% duty cycle. Put 100R power resistor as load. You will have to measure about 6V, if everything is allright.

Closed loop control OK, this is the hardest part. Mostly because it's a whole theory, but if you have time to discover it, i will provide some basic guidelines to create a PID controller with your Arduino.

Set VFB_Reference = 1.65V

Define interrupt that will be called at the beginning of each PWM cycle Sample the VFB exactly 200nsec after the start of interrupt

Set VFB_Error_Last = VFB_Error

Set VFB_Error = VFB_Sample - VFB_Reference

Set VFB_Integral = VFB_Integral + VFB_Error

Set VFB_Derivative = VFB_Error - VFB_Error_Last

Set Voltage_Command = A * VFB_Error + B * VFB_Inegral + C * VFB_Derivative

Convert Voltage_Command to PWM_Command.

Pay attention: I make all calculations in volts. This is the best way for debug. So don't forget conversions from ADC to volts, working in floating point, etc. Also the VFB_Integral variable should be limited - otherwise it may roll.

A, B and C are coefficients that you will have to adjust. May be just anything, depends on both power stage and load, but also on how well you make all the circuit.

Be very careful with sampling VFB. It must be as accurate and silent as possible.

Be ready to surprises like overshoots, etc. To avoid them use soft start: VFB_Reference will start with 0V and rise slowly to 1.65V over long time, like 100msec.

Diagnose overvoltage. If you see VFB 10% higher than 1.65V, declare fault condition and set VFB_Reference to 0.

Good Luck! It's a serious project. I would say, for me after years in industry, it's doable, but not trivial. If you succeed, you will become (and i am serious about it) a real specialist in switching power supplies, and a really good candidate to become a control engineer, which in turn is really cool.