43

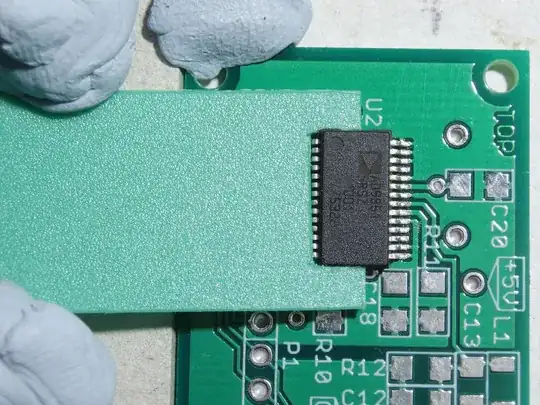
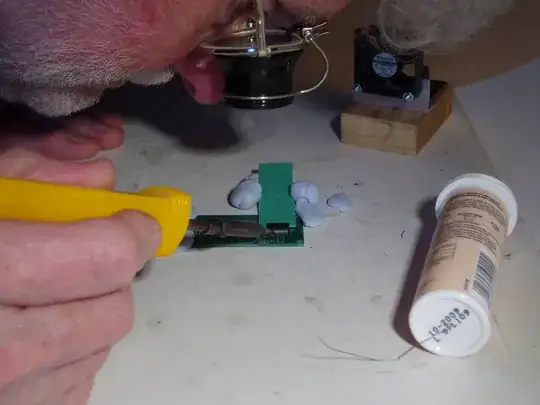
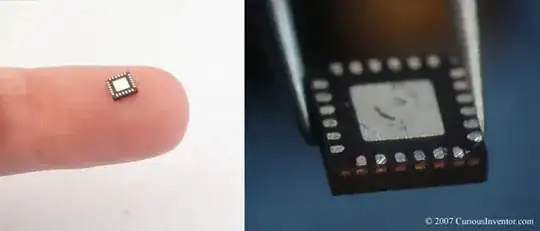
I go through this every time I have PCBs I need to populate with SMD parts, and this has become more an issue as pin spacings have gotten tighter, and my hands have become less steady with age.

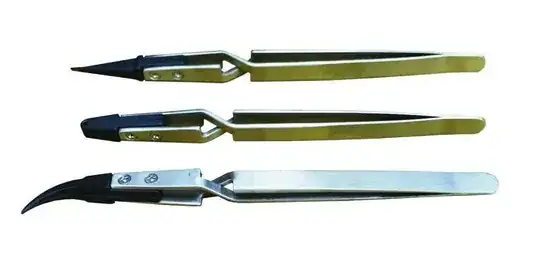
So far I've modified some curved tweezers with a rubber band for grip tension, to help hold a component in place until 1 or 2 pins can be soldered. It works but it can be cumbersome. The clamping force needs to be very light, and it seems one slight tap with a sharp iron tip will still move it. I've also tried various glues, placing a pin drop of glue in the center of where a component would go.

That sometimes works, but all the glues I've tried either waste my time waiting for it to dry, or dry (skin over) too quickly when grabbing some more. Worse, too often even a pin drop of glue will spread onto the pads, and then I have to waste more time cleaning things up.

If I had my druthers, all SMD pars would come with peel off self stick backing. But anyway, suggestions would be welcome. It will be a long time and many test markets before anything I'm doing will be populated for me with pro pick and place machines.

Ricardo
  • 6,134
  • 19
  • 52
  • 85
Randy
  • 3,205
  • 3
  • 21
  • 38
  • 2
    This is a "What's the best ___?"-type of question and will be moderated soon. Personally, since the one-offs are just for me to debug before having a pick-and-place shop make a bunch, I just make the pads protrude past the chip's edge so that I have room to hit them with a fine-tipped iron. This trick will help even if you attempt to reflow first. – Jon Feb 12 '15 at 18:58
  • 4
    This is a wiki type post that has every valid reason to be here. There are a couple others like this too. – Passerby Feb 12 '15 at 19:49
  • 11
    This absolutely looks like a good question to me. – Greg d'Eon Feb 12 '15 at 19:50
  • 2
    @jon Yes! If you're planning to hand-solder, Do Not use the recommended footprints! They're for paste, stencil and reflow. Add 0.5 to 0.7 mm to the ends of the pad, so you can get the iron in there. The component won't self-centre so well, but that's OK, you're holding it down. – tomnexus Feb 12 '15 at 21:31
  • 1
    And I thought I was the only one making my own footprints with longer pads. :-). But still, it would be nice if the parts could just be made to stay put better while you work. So good ideas kicked in about past methods with hat air or oven, and I'll definitely have to try it. But a glue with a very high viscosity that stick quickly without drying up while your applying would still be a welcome product. – Randy Feb 12 '15 at 23:32
  • I like his peel-and-stick suggestion! – Jon Feb 13 '15 at 01:46
  • In addition to all my up votes to everyone involved, I just want to shout out a hearty human thanks to all of you. Today, for the first time, I tried using paste on one of my boards, along with a toaster oven. No stencils, just dabbing and following the advise I found here. Granted, my unsteady hands made me get creative, making tools to help me be a better "pick and place" machine. But the end results were great. Just a few touch ups later and all was well. The best thing was, the connections were visually so much better then my best hand work. You folks have changed my life! Thanks again!! – Randy Mar 16 '15 at 20:15

9 Answers9

26

Pssshh to the guys using stencils :) Bet I can put a QFP down faster than you can paste, place, and re-flow :) Although it's nice if you want to get that center pad soldered.

Seriously though if we're talking ICs here I just flux pen a little, then put some solder on one pin in the corner. Then put the chip near it. Now just flow the solder with your iron and nudge it into place with a pick, tweezers or the finger whatever works for that part. Then you can align all the other sides by heating the solder a little and nudging it. Then tack the opposite corner and off you go.

Don't waste time trying to align then solder, align while you solder.

For little guys like a SOT-23 or a 0201 I usually first put a bit of solder on one pad then heat it up and slide one pad of the component in with the tweezers. Pull the iron off and it stays in place, you can use as much force on the tweezers as you need to. Then just finish up the other pins. You can go pretty fast with this if you're placing multiple parts just prepare one pad on each footprint, then slide in the parts and then go back and do the other pins.

That's my basic hand technique, works for QFNs too if you don't need the center pad soldered (the board needs to be on an angle). I usually drag solder the IC's which is really fast when you get the hang of it.

For my stencil friends, you should see that new printer on kickstarter that puts down solder paste...

Some Hardware Guy
  • 15,815
  • 1
  • 31
  • 44
  • 1
    1 QFP? Probably. 3+ QFP? Nope. Hand soldering doesn't scale for complex boards. – Connor Wolf Feb 12 '15 at 19:12
  • I know I'm joking, although depends how cheap your labor is... Also complex boards go to the assembly house. – Some Hardware Guy Feb 12 '15 at 19:14
  • 1
    Most of my boards are still well under 100 parts. My problem is that the techniques you are describing worked well for me up until about the last 10 years. Now, just from age I guess, I find my dexterity and steadiness to be getting worse. The vision part is easy... just use a magnifier. But for the placement while soldering, I sure do wish there were some product that would let me get my parts placed and then HOLD it. For me, trying to move a part into place while I'm heating is just becoming unworkable. – Randy Feb 12 '15 at 23:37
  • Interesting that could be tough even trying the solder paste route. Although look at something like this https://github.com/celer/picktor/ it's an attachment to a 3d printer that let's you pick and place. Also this reminds me of a probe station I looked at. Take a look at this from gigaprobes http://www.gigaprobes.com/probemanipulators.html You may not need something that fancy (I made one out of an erector set instead of buying it). – Some Hardware Guy Feb 12 '15 at 23:56
  • but if you had something where you could adjust the holding arm to the side of your microscope, then you could use this to dial it into the exact right position. Just some thoughts, with tweezers on the end of one of these arms it might work well. After you get it grossly in position there are little knobs to fine tune x,y,z position. – Some Hardware Guy Feb 12 '15 at 23:58
  • If only my eyesight and dexterity followed Moore's law as well... – copper.hat Feb 13 '15 at 04:15
24

I just saw the SMD beak on Hack-a-day that looks like what you are looking for (I want one!)...

enter image description here

http://vpapanik.blogspot.de/2015/02/the-smd-beak.html

I've also had luck...

  1. use a little piece of scotch or painter's tape on one side of a part to hold it down
  2. tack down a couple of leads with solder
  3. remove tape and solder down properly

For smaller parts (ie. SOT23)...

  1. tin one pad (typically a middle one)
  2. hold the part in exactly the right place with tweeters
  3. quickly touch the lead over the tinned pad with your iron to tack it down
  4. properly solder the other pins and work your way around back to the tacked one.

A nice feature of this technique is that you can rotate the part very precisely by moving your elbow (your arm acts like a big leaver). Even if you are a bit shaky, you can wait until the part happens to be perfectly aligned and then lock it down with the tack.

bigjosh
  • 9,888
  • 29
  • 48
14

In general I don't hand solder any more. There's a few components though that I do still prefer to do by hand, such as 0.5mm pitch TQFPs or TSSOPs (the really fine ones) - unless I have a stencil of course. For those I just hold it down with my finger until two pins have been tacked down, when it then holds itself in place.

Anything smaller than that gets reflowed. I can't stress how much easier it is to use solder paste and a reflow workstation (or oven for full boards) instead of a soldering iron.

Majenko
  • 55,955
  • 9
  • 105
  • 187
  • 1
    I will try it. So far I've only used my re-flow station for removing parts, when I have no choice but to replace a defective. I'm always so worried about scorching parts or ruining them to solder them down. I'd also heard that paste has a short usable shelf life, but maybe that's not so true. Thanks for the tip. Not sure I could apply paste very neatly with my shakey hands, but it might eb easier than I think. – Randy Feb 12 '15 at 20:41
  • 1
    I use it in a syringe - pretty straight forward to apply it then. I run at 240°C if I'm doing SMD LEDs, or 275°C for other things. Hotter than that can scorch the board sometimes. – Majenko Feb 12 '15 at 20:51
  • Using an air powered syringe (controlled by a foot pedal) probably gives you better control than one you press by hand - but I'm just guessing, I've never used a manual one. – Jeanne Pindar Feb 12 '15 at 22:34
  • OK, I've just ordered a syringe of "no clean up" solder paste to try. I always thought though you had to have stencils made to easily use paste though. I'm skeptical of my ability to place little beads of paste manually, and then place the components, without ending up with messy smears and solder bridges everywhere. – Randy Feb 13 '15 at 18:21
  • Another good tip is, if suitable for your vision requirements. Get some f3.00 reading glasses. Makes seeing it all much much easier. – Majenko Feb 13 '15 at 18:25
  • 1
    You don't necessarily have to put a tiny bead on each pad. If you put a line of paste along a row of pads, when it melts surface tension will pull it onto each pad, especially if you heat it evenly with hot air. The surface tension also tends to pull the part into alignment. It's really neat - check out some of the many YouTube videos on the subject. – Jeanne Pindar Feb 14 '15 at 22:21
  • 1
    Well its probably my lack of experience, but just a warning to others who could make the same mistake. I went to mouser, my favorite distributor, entered "solder paste" in their product search, the top product was a no clean solder paste in a syringe. Well it came today, and its nothing but thick flux in a syringe... no solder in this stuff at all. maybe they categorized the product wrong, or maybe "solder paste" is not a sufficient description, but that was a few days wasted and a disappointment. Any specific product recommendations would be appreciated so i don't make the same mistake. – Randy Feb 17 '15 at 20:35
  • Don't worry, you're not the first to fall into that trap. It's an easy mistake to make, and many sites don't specify it correctly. I use ChipQuik SMD291SNL10. Flux paste is good to have though if you ever want to reflow BGA. – Majenko Feb 18 '15 at 22:33
11

I wrote an article on soldering SMDs for the (Amateur) Radio Society of Great Britain magazine, RadCom, and include here some of the photographs from it that illustrate my methods of holding SMDs down. I like to have them securely clamped, with both hands free for soldering.

They show a wooden toothpick for SMDs that will sit nicely on the pads, and a close-up; how I use tweezers so that my hands are free, for SMDs that tend to slide off the pads; and how for ICs I cut a tight fitting piece of plastic as a clamp In this last picture the hole in the cardboard holds the IC upside down so that I can tin the pins.Finally an overall view of my workstation. Since taking those pictures I have replaced the small fan, to disperse the smoke, with a larger fan and filter.

My impromptu jig .... close upusing tweezersA clamp for ICs .... in usemy workstation

Harry Weston
  • 2,170
  • 3
  • 24
  • 28
  • 1
    That green notch tool holding the AD9851 ... I'll bet there will be more than one who wants the gerbers for it, or would pay money to have a set of them. Sparkfun, anyone? – Damien Mar 01 '15 at 00:30
  • As hinted in the text in my answer, the "green notch tool" was cut, with a craft knife, from a piece of plastic, which itself was the cover of a discarded A4 file. Cut slightly too narrow at first and pared wider until it just held the chip firmly. It's only needed until one pin is soldered, then the chip is held down with a finger while the tool is removed, and, after a check that the IC is in the right place, the rest of the pins can be carefully soldered. – Harry Weston Mar 02 '15 at 15:10
9

Solder paste!

Don't use an iron: get a cheap reflow oven or a toaster oven. I use a toaster oven for whole PC boards and hot air if I screw up and need to remove/replace a single component.

Doing it with a solder iron is possible, but even there I'd use solder paste. The paste works really well to hold the part in place while you solder it.

lyndon
  • 4,366
  • 1
  • 16
  • 11
  • 1
    Thanks. I have a reflow station, and I guess I have to overcome my fear of burning things to hell. :-) Can you recommend an easy way to apply it? Maybe its possible to get solder paste in some kind of hypdermic like applicator, with a tiny end to make tiny blobs with? – Randy Feb 12 '15 at 20:44
  • Yes, it often comes in a syringe. Be sure to get some tips for the syringe. – Jeanne Pindar Feb 12 '15 at 22:35
  • I've already commented this to someone else, but just how do YOU do this without a stencil? – Randy Feb 13 '15 at 18:22
  • What Jeanne said: it comes in a syringe. Make sure your syringe has a tip. You get the hang of dispensing the right amount pretty quickly and I'd also get a small flux pen. Otherwise OSH Stencils is very cheap and good quality. – lyndon Feb 14 '15 at 00:13
  • If you're worried about overheating one particular part while placing another right next to it, you could make a little shield for it out of tinfoil. – Jeanne Pindar Feb 14 '15 at 22:32
6

Get yourself some reverse tweezers (squeeze to open).

I don't use it every time because I'm fairly steady with tweezers + part in one hand and soldering iron in the other, but a helping-hands holding a pair of reverse tweezers holding the part seems to work.

Basically, have one of these guys:

enter image description here

Hold a pair of these: enter image description here

That are holding this:

enter image description here

If you let the helping hands grip a little high on the tweezers then they can kind of lean on the part to push it down on the board. This works best when you have the board in a vice that holds it at an angle, but can work flat on the bench too.

Samuel
  • 11,811
  • 31
  • 51
  • I have a pair of reverse tweezers, though not curved for SMD work as that bottom one you showed. Who makes that tool? – Randy Feb 12 '15 at 23:42
  • 1
    https://www.sparkfun.com/products/12572 – Jon Feb 13 '15 at 01:51
  • @Randy It's the link above the picture. Or the pair Jon linked. Be advised that if you ever want to use them for 0402s or 0201s, anti-magnetic and anti-static are a must. – Samuel Feb 13 '15 at 02:09
  • Thanks. Well for all the reasons pertaining to my decreasing dexterity, I've decided to avoid discrete smaller than 805, and pin pitch less than 50 mils. But then there are these pesky parts with 30 mill spacing. For static, one of the great things about living in Florida (totally different from when I lived in NY), static is way way lower due to the higher RH (I guess). I dare say I've not fried one chip due to static since I moved here! :-) – Randy Feb 13 '15 at 18:25
2

Despite having shaky hands and old eyes I use reading glasses and tweezers to solder SMD. I first solder one pad (usually middle). I rest my left hand on the bench with tweezers holding SMD device. With right hand I use soldering iron to melt solder on pad.

user179756
  • 21
  • 1
1

Some Hardware Guy mentioned it in passing, but I want to re-iterate: Flux is your friend. The smallest possible smear of rosin (only) flux is slightly sticky. Think about a baseball pitcher's hand. Unlike glue, you can readily solder through the rosin smear. It helps instead of hurts.

Chip Veres
  • 11
  • 1
  • True and thanks! I though I was one of the few that even used that old thick soldering paste. It does help, though it can add to your cleanup tasks later. At this point though, I've become convinced by folks here of the beauty of using solder paste (the kind with pulverized solder) along with a hot air reflow tool (or even just a toaster oven). Boy has this improved my build efficiency (and neatness!) :-) – Randy Sep 13 '16 at 17:29
0

I have used thermal (heatsink) glue to temporarily hold down larger ICs. It's probably preferable that than other glues (thermally insulating) or rosin (thermally insulating and varyingly corrosive). Just a tiny bit is needed, it is viscous and repositionable for a while. However, it might make desoldering harder - although it's not a particularly strong glue, so YMMV).

I considered an XY table of a milling machine to finely position things, or for moving a tool (eg tweezers). There are some very small, remarkably cheap ones available (eBay, Amazon). For a similar price, there are also microscope XY platforms that could probably be used.

enter image description hereenter image description here

And slightly off topic but really insteresting is this expensive manual pick-and-place jig, the CIF V900120:

enter image description here

There is even a version with a close-up camera and TFT screen to help fine positioning.

Jodes
  • 5,044
  • 9
  • 48
  • 75